


.webp)


.webp)

SOP for ThermoFisher Scientific HPLC (Make: DIONEX, Model: ULTIMATE – 3000)
PURPOSE
To develop the standard operating procedure for HPLC make DIONEX, Model ULTIMATE-3000. To ensure its compliance with the provision of Good Laboratory Practice regulations.
SCOPE
Describes the finest details of the steps to be followed in one of the simplest and most precise ways required in the analytical technique.
RESPONSIBILITY
It is the responsibility of the QC Officer.
ACCOUNTABILITY
Executive – Quality Control
Manager – Quality Control

PROCEDURE
Cold start of HPLC
- Generally, the instrument is kept “ON’’ in the morning and the unit is put “OFF” in the evening.
- First, start the air conditioners.
- Switch on the UPS followed by the Computer.
- Switch on the ultimate 3000 pumps (from the switch which is located at the back of the pump).
- Switch on the ultimate 3000-column compartment (from the switch which is located at the back of the pump).
- Switch on the ultimate 3000 Detector (from the switch which is located at the front of the pump).
- Go to chromeleon software.
Purging of Channels
- Double-click on the Chromeleon software. The window of the last work done will appear.
- Go to the Default panel tab set at the taskbar. Chromeleon server window will appear to click on my computer followed by ok.
- Then click on my computer, and click on chromeleon server.
- Panel tabset 1 window will appear. Go to Home and connect all (Pump, Column
- compartment, and detector). The green signal will appear if connected.
- Click on the pump, pump setting window will appear.
- Open the purge valve, by opening the ultimate 3000 pump compartment (a metal screw is located, lose it) (rotate it in the anticlockwise direction).
- Click on the motor, and the green signal will appear if connected.
- There are four lines present in the system (A, B, C, and D). To purge those lines, set the percentage value of eluent i.e 100% (purge the line whichever is necessary a/c to sample by setting the solvent volume 100%) in each line one by one.
- For purging lines, B, C, and D, make it 100% each one by one.
- Now click on Purge OFF then the following signal will appear Do you really want to execute this command?
- Click on OK, then the icon of Purge ON will turn green.
- Now purging will start which can be seen on the ultimate 3000 pump compartment screen.
- After 5 min purging of the line will be completed.
- Purging of line A, we have to purge B, C & D zero.
- The same procedure is followed for all lines.
- After the completion of purging, the valve should be closed.
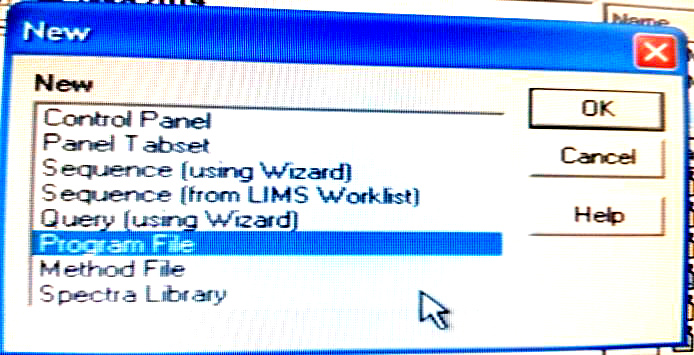
How to Create a New Program
- Go to File and select New, the following tab set will appear

- Select the Program file and click on OK.
- After clicking on OK the following window will appear:

- Click on Next. The following window will appear: According to the analyte, Temperature will be set if required.

- Click on Next. The following window will appear: In this section Gradient type, Name of the Solvents, Solvent Percentage, Pressure limit and Column flow will be selected. Maximum flow acceleration/deceleration will be a default.

- Gradient type will be selected according to the analyte. It can be Isocratic, Ramp or Multi gradient.
ALSO READ: Checklist for Preventive Maintenance of HPLC

- Click on Next. The following window will appear: For data acquisition UV will be selected. Here total run time for a single analysis will be mentioned as per requirement.

- Click on Next. The following window will appear:

- Click on the desired wavelength and 3D, and disconnect the rest of the wavelength by just clicking on each one when working on a single wavelength.
- Generally, the UV option is clicked for data acquisition.

- Click on Next. The following window will appear: Give the name of the program and select Review program in the new window then open the program file and recheck it then click on save in the folder having all the program files.

- Click on Finish the following window will appear. Review this program if changes will be required then do it and save this program in the program folder located in HP local.

How to Create Method File
- Go to File, click on New, select Method File, and click on OK.

- A window will open save the window and assign the same title as given to the program file then save in the folder having the method file.

How to create a new sequence
- Go to File and click on new, select Sequence (using Wizard).

- Click on OK. The following window will appear.

- Click on Next. The following window will appear:

- Click on Next. The following window will appear: Select the number of vials and inject/vials(for Sample) as per requirement and click on Apply.

- Click on Next. The following window will appear: Select the number of vials and inject/vials(for Standard) as per requirement and click on Apply.

- Click on Next. The following window will appear: Click on Browse to give select the name of the Program and Quantification Method.

- Click on Next. The following window will appear: Give the name of the Sequence.

- Click on Finish. The following window will appear:

- Click on Done. The following window will appear
- Go to batch and click on start.
- The start batch window will appear.
- Add the desired batch.
- Then click on ready check.
- If a ready check is successful then click on OK.
- Click on start.
- A green background strip will appear.
- Now go to the panel tab set double click on PDA and wait for the message on the control panel screen. Following the message will appear: AZ- Done
- Now load the sample with the help of a 25 micro-lit syringe and turn the valve from load to inject.
- Now, wait for the peak to appear on the screen.
Procedure for Peak Decoration: (Quantification)
- Go to Chromeleon Browser.
- Go to SEQUENCE and select the concerned sequence.
- Click on serial number one. Chromatogram will appear
- Go to the toolbar then select QNT Editor.
- QNT editor will appear.
- Click on the GENERAL tab at the bottom of the screen. The following screen will appear.
- Specify Title
- Specify the Dimension of the amount as ppm.

- Click on Detection Sheet. The following window will appear:

- Append line
- Specify ‘Inhibit Integration’ at 0.00 time and set parameter value ‘ON’ at serial no. 2.
- Specify a suitable time limit to remove ghost peaks e.g. 9.00 min (inhibit integration off).
- Specify the minimum area to remove smaller peaks at serial no. 1.
- Specify the fronting sensitivity factor and tailing sensitivity factor to obtain optimum results.
- Click on SAVE.
- Go to Peak Table Sheet. The following window will appear:

- Give Peak Name
- Give average retention time.
- Give window
- Click on SAVE.
- Go to the amount table sheet. The following window will appear:

- Right-click on the page ➡ columns ➡ edit amount columns Window will appear. Edit amount column
- Set assign standards on the basis of ‘Name’.
- Click on Auto generate.
- Generate a separate amount column for each standard window that will appear. Click on apply ➡ OK.
- All the standards will be seen in the amount table sheet set the amount of ppm used for each standard.
- Click on SAVE.
System Shut-Down Procedure
- Go to pump settings in the panel window.
- Set the flow rate to zero.
- Check the result window.
- Click OK.
- Wait for the flow rate to become zero on the pump display screen.
- Switch off the motor by clicking the OFF button.
- Click on the DISCONNECT button.
- Close the pump settings window.
- Chromeleon PDA detector settings window will appear.
- Switch off the UV lamp.
- Click on the DISCONNECT button.
- Close the detector settings window.
- Chromeleon panel 1 column compartment window will appear.
- Close the panel window.
- Switch off the Ultimate 3000 Pump switch located at the backside of the equipment.
- Switch off the Ultimate 3000 Column Compartment switch located at the backside of the equipment.
- Switch off the Ultimate 3000 PDA Detector switch located on the front of the equipment.
- Shut down the computer.
PRECAUTIONS REGARDING OPERATING HPLC
- We should purge only those lines which are going to be used.
- Daily purging is not necessary. If the system is closed for a long time purging is a must.
- Always use ultrapure water which should be sonicated before use.
- All organic solvents should be sonicated well before use.
- Lines should be dipped properly in the solvent.
- Bottles for solvents should be cleaned. Always check for any fungal growth or any dirt before use.
TROUBLESHOOTING
- Only HPLC-grade solvents should be used so that the chances of contamination are as low as possible.
- Buffer salts should be flushed from the system daily with ultrapure pure water so that the lifetime of a column can increase.
- The sample should always be dissolved in the mobile phase to avoid peak broadening, variable peaks, and split peaks.
- Variable peak heights, split peaks, and broad peaks can be caused by incompletely filled sample loops, incompatibility of the injection solvent with the mobile phase, or poor sample solubility. Whenever possible, dissolve and inject samples in the mobile phase. Otherwise, be sure the injection solvent is of lower eluting strength than the mobile phase.
- Detector problems fall into two categories — electrical and mechanical/optical. For electrical problems, you should contact the instrument manufacturer. Mechanical or optical problems usually can be traced to the flow cell.
ABBREVIATIONS
HPLC - High-Performance Liquid Chromatography
UV - Ultra Violet
PC - Program Controller
ANNEXURE
Nil
REVISION HISTORY
Nil
ALSO READ: SOP for Operation of Chromeleon Software
)
Posted by PharmaInfo

0 Comments